Canva has a built-in website builder. And yeah, it’s free.
You need no hosting to set up, no domain drama, and nothing to code. You just pick a template, customize it, and hit publish.
That is basically the whole process.
I know that sounds too simple. And to be fair, it kind of is, but in a good way.
If you’ve never built a website before and you just want something live fast, without spending anything, this is probably the easiest way to get there.
Here’s how it works.
Disclosure: This post has affiliate links. I earn a commission if you buy, at no extra cost to you.
Before You Start: Know What Kind of Website This Is
Canva websites are simple by design. You’re not building an eCommerce store here, and you’re not getting a blog with categories and a comment section.
What you are getting is a clean, presentable page, or a few pages, that you can share with anyone.
So yes, for a portfolio, a landing page, a small business intro, a link-in-bio style page, or just something that looks real and professional? It actually does the job pretty well.
On the other hand, if you need something bigger, I have a business website guide here that covers the more advanced route.
But if you’re just starting out with this for the first time and want something live today, keep reading.
Step 1: Create Your Free Canva Account (Takes 60 Seconds)
First, you need a Canva account. The free plan is enough for this. Create one here if you don’t have one yet.
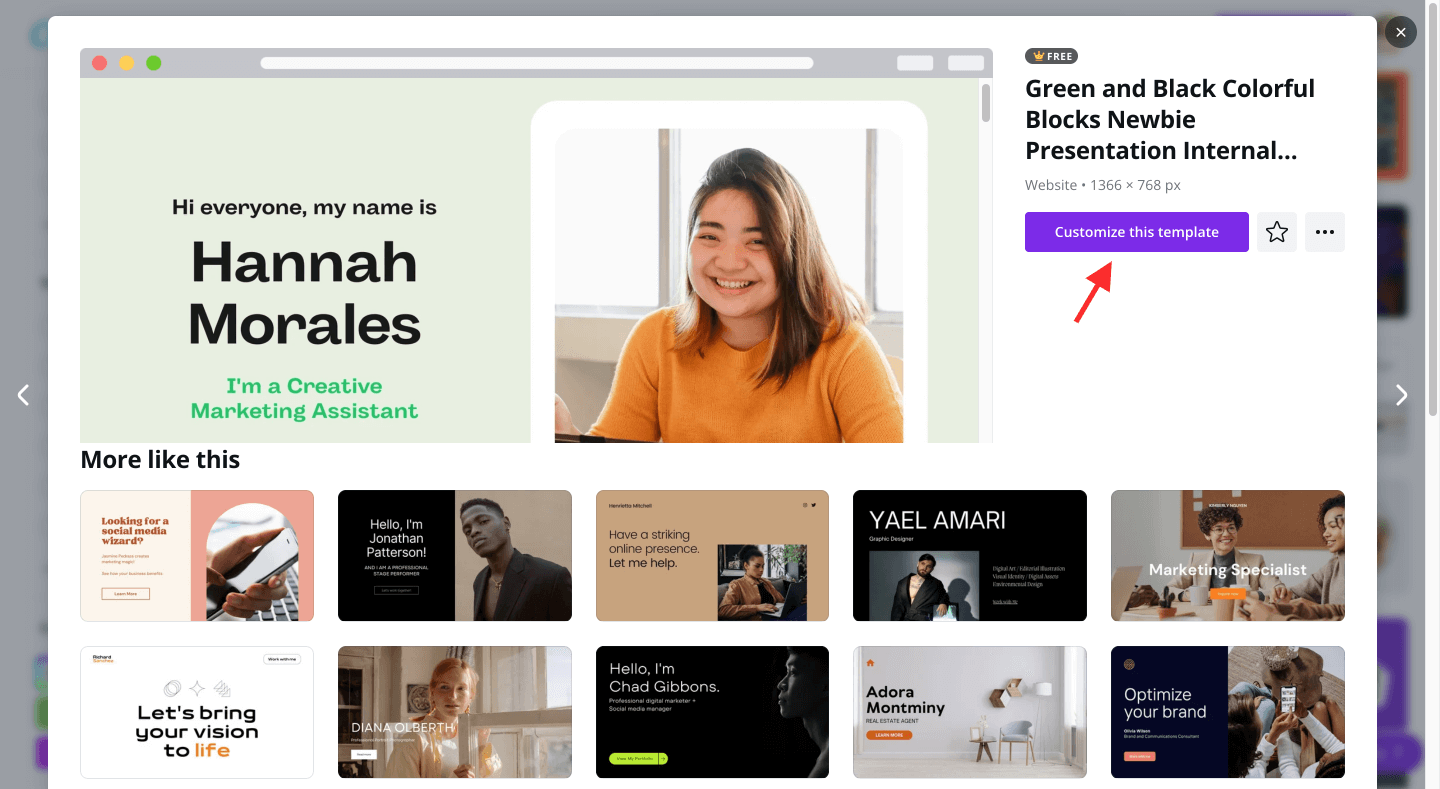
Once you’re in, use the search bar on the Canva homepage and type “websites.” You’ll see a bunch of templates come up. Some have a small crown icon on them, which means they’re for Canva Pro users.
Everything without the crown is free.

Pick one that roughly matches what you’re going for and click “Customize this template.” Or you can go straight to Canva’s website builder and browse from there.
Don’t overthink the template. You’re going to change almost everything on it anyway.

Step 2: Choose a Template and Start Customizing It
This is where you will spend the most time, and it is the fun part too.
The Canva editor has everything you need on the left sidebar, your images, text styles, elements, and a tons of other stuff. If you want to edit something specific, click on it and the options for that element show up in the top bar.
You can change the colors, swap out the images, rewrite the text, adjust spacing. All of it.
If you want to add more pages, there’s a bar at the bottom where you can add new pages and move between them.

If I have to mention one thing, I would say is this. Do not try to get everything perfect the first time around. Canva lets you publish it first, and then you can always come back later to make changes.
So just focus on getting the content right for now, and you can always clean up the design the way you like.
Step 3: How to Add a Contact Form for Free (No Code Needed)
Canva doesn’t have a built-in contact form, which is the one thing people usually get stuck on. This might be something you don’t need from day one and maybe never need one either.
But just in case, here is the workaround for that. You can use a free form builder like Jotform instead.
You create your form there, and it doesn’t matter if it is a contact form, a booking form, an order form, or any other type you want. Then you simply add a link to it from your Canva website.

To do that: select any text or button in the Canva editor, look for the link icon in the top toolbar, and paste your Jotform link there.
That’s it. No embedding, no code, just a link.
Again, it’s a bit of a workaround, but it works, and it’s free.
Step 4: Get a Domain or Use the Free Canva Link
Once the design is done, click the “Publish as Website” button in the upper right corner of the editor.
After that, a small popup will show you two options.

The first is a free Canva domain. Your URL will look something like yourname.my.canva.site. It’s not the most polished thing in the world, but it works and it costs nothing.
If you’re just testing something or building something personal, this is fine for now.

The second option is to register a proper domain, like yourname.com. Canva actually lets you buy one directly through them. It has a more professional feel, and if this is for a business, it’s worth it at some point.
Pick whichever option makes the most sense for what you are trying to do, just follow the steps one by one, and then move on to the next step.
Step 5: Go Live and Share Your Site With Anyone
Now, before you hit that final publish button, take a couple of minutes to add a short site description. It’s just a sentence or two about what the site is.
It can show up in search results and also when someone shares your link. So make sure it is clear, and do not worry about making it sound clever.

You can also add a password if you want to keep it private for now, which is useful if you’re still working on it and don’t want random people landing there.
Once you’re ready, click Publish. Your site goes live. Anyone with the link can see it on any device.

Final Thoughts
Just five simple steps, and you have got yourself a real live page out there on the internet for everyone to see.
It may not be perfect, and that is okay. First versions rarely turn out perfect anyway.
But it’s live, it’s free, and you can go back and update it whenever you want.
If at some point you need more than what Canva offers and have to move to something else, that is something you can figure out later on.
For now, just get version one out.