Are you looking for the easiest way to set up a custom domain in Blogger?
If you are a blogger, it is important to have a domain name so that you can have an identity of your own. If you don’t have one, you can make your own blog for free on blogspot.com.
But everybody knows blogspot.com blogs by the name Blogger. And that’s not what you want at the end of your blog URL.
Your domain name is vital to your blog’s success so that people actually find you in the first place and remember you later on.
So you need a domain name.
Here’s how to get a cheap domain name and set it up for your Blogger blog.
What's Inside
How to Register Your Domain Name
Registering a domain name is easy, and it only takes a couple of minutes with most providers.
With 11 million domains under management, Namecheap is one of the top domain registrars that offer domains at low prices.
The coolest thing is that they offer .com domains for just $6.49, which is something that we can’t expect from other providers in the same market.
In order to register your domain name, enter any name that you want as your blog domain below and click on the “Find” button to take your first step.
Check if your domain name is available:
powered by Namecheap
Or you can head over to the Namecheap website, and I recommend you follow our domain registration guide to learn how to do it the right way.
How to Set Up a Custom Domain in Blogger
When you get your domain name registered, you’re now ready to set it up for your Blogger blog.
Let’s start the work.
Step #1
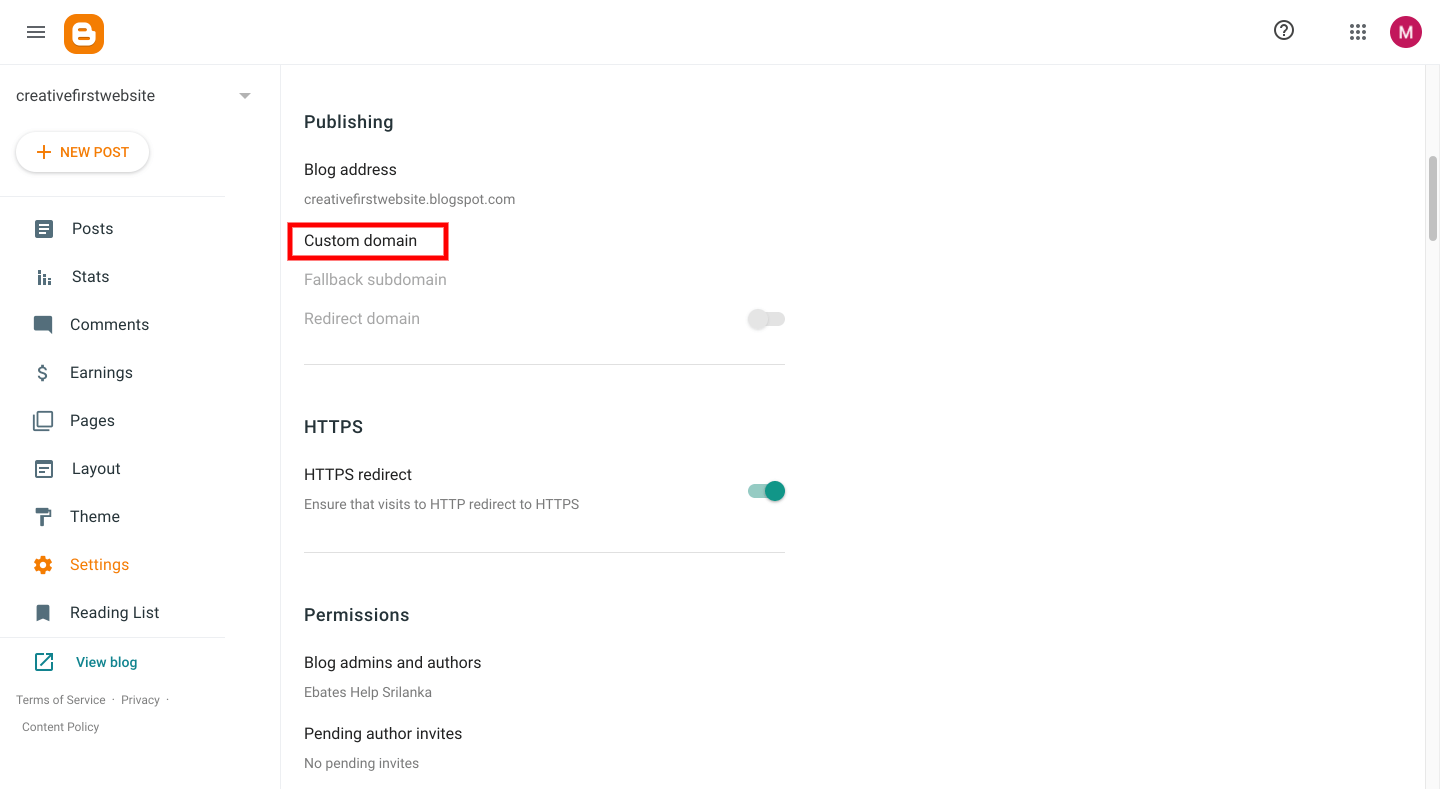
First, head over to the Settings page of your blog and click on “Custom domain” under the publishing section.
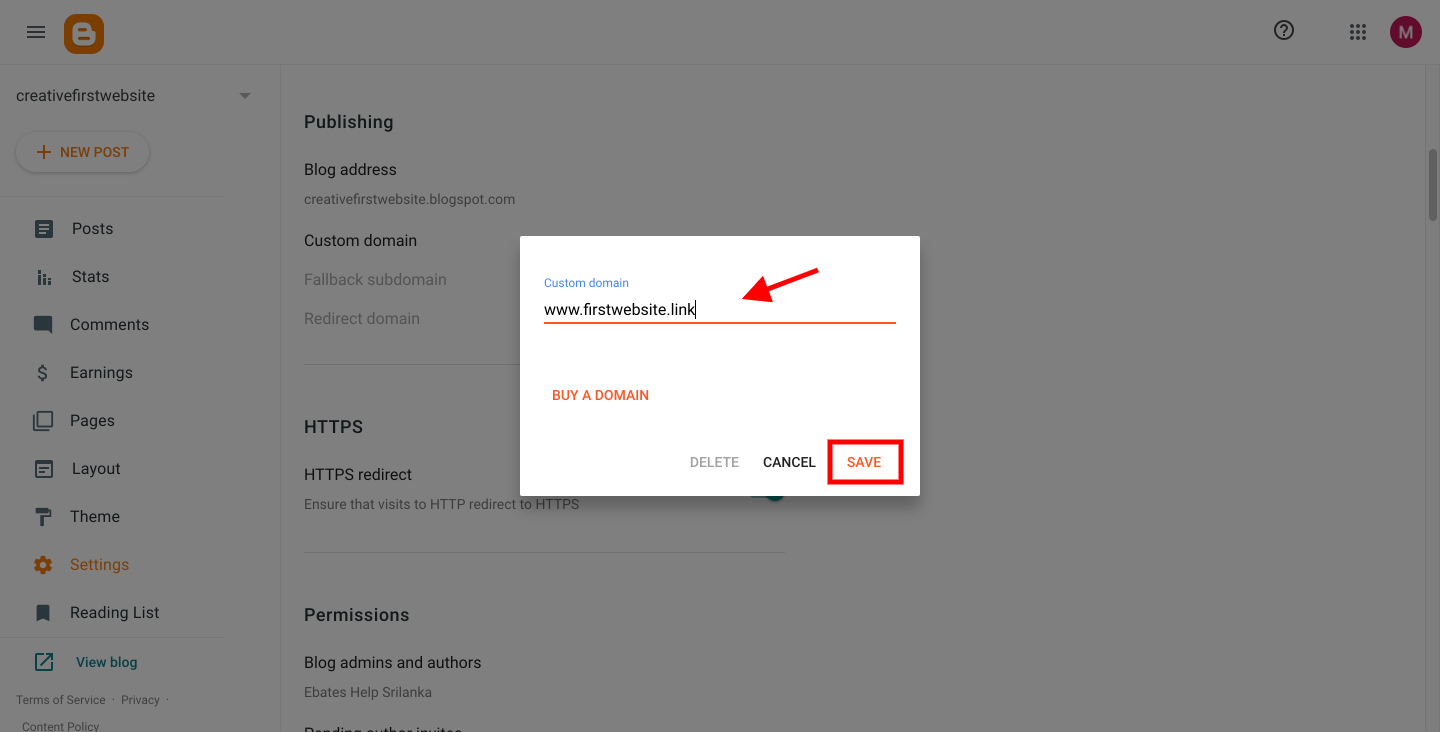
Now, enter your domain name (with WWW.) there and click “Save.”
After that, you’ll get an error with two CNAMEs that need to be updated in the domain name provider’s DNS settings. This is used to verify your authority over your domain.
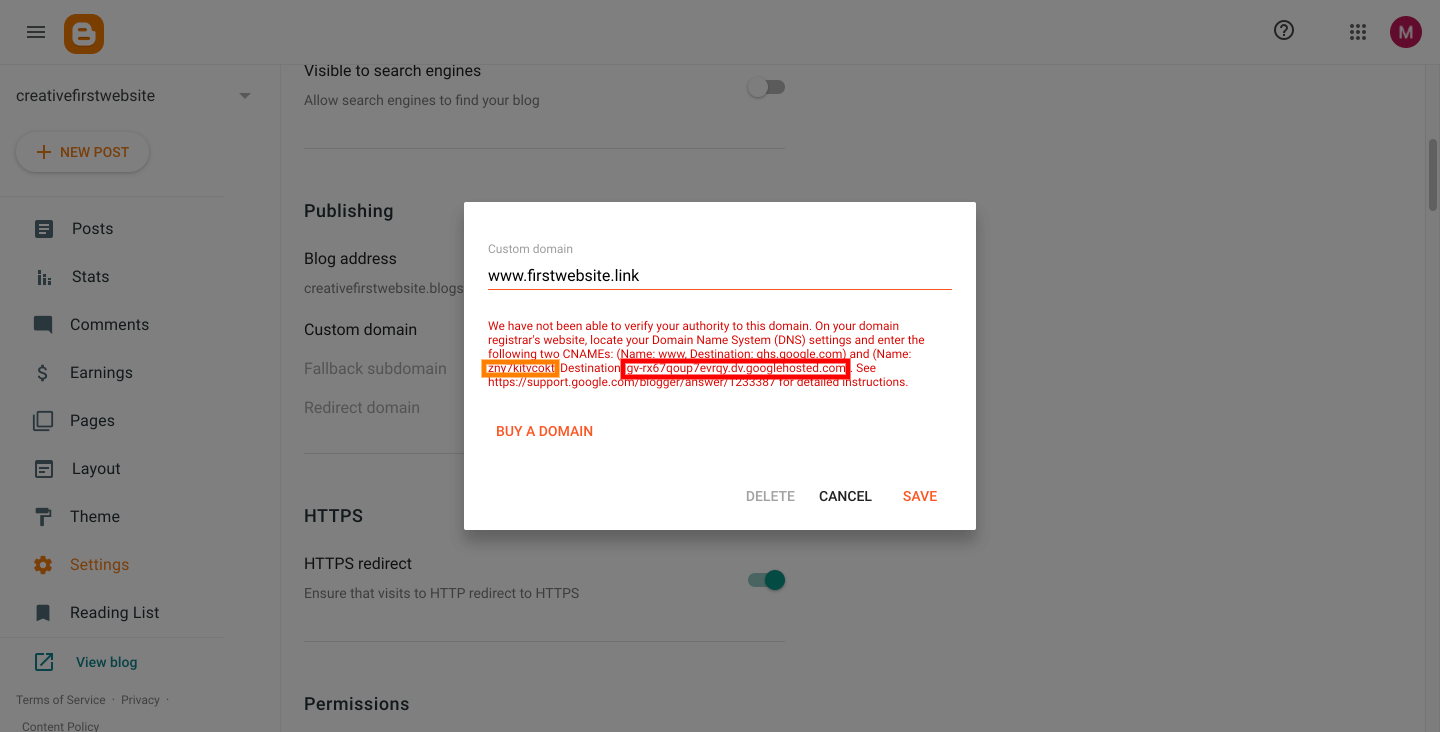
All you need to do is copy those values (Name and Destination) and open up a new browser window to update your DNS settings at Namecheap.
Step #2
Simply, log in to your Namecheap account and navigate to the Domain List and click “Manage” under your domain name.

Click on the Advanced DNS and then click on the “Add New Record” button.
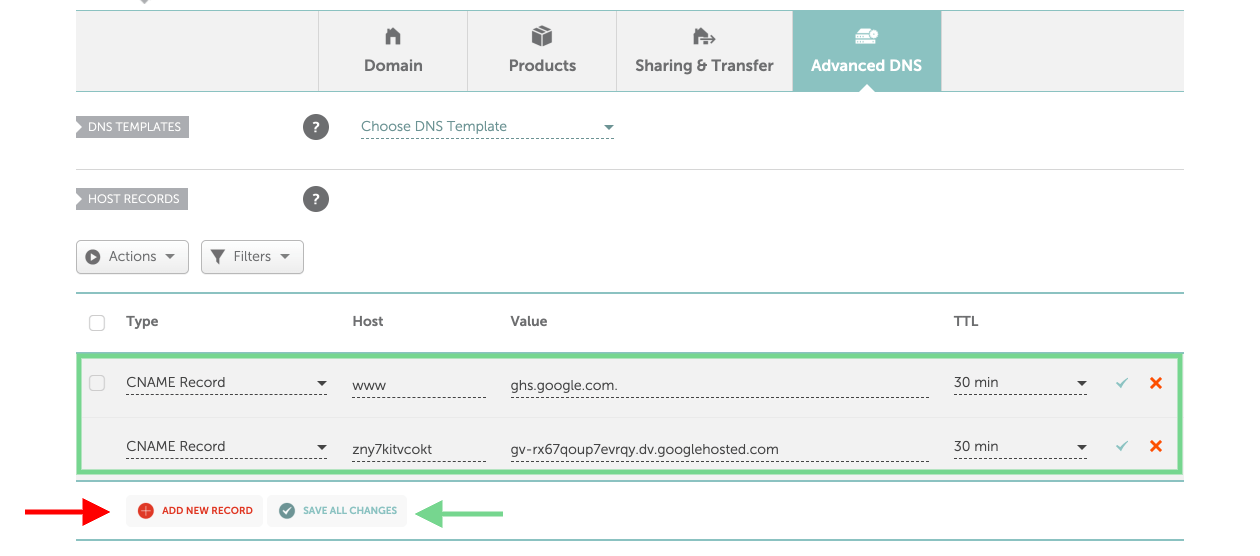
First of all, you have to add 2 CNAME values that you’ve copied from step#1.
- Common CNAME WWW mapped to ghs.google.com
- CNAME with values (Name and Destination) provided in your Blogger account. (This is specific to each blog as it is shown here.)
Next, you will also need to add 6 A Records for @ pointing to:
- 216.239.32.21
- 216.239.34.21
- 216.239.36.21
- 216.239.38.21
Once all records and values are added, your DNS settings will look as follows, and make sure that you’ve entered the right values for the second CNAME record.
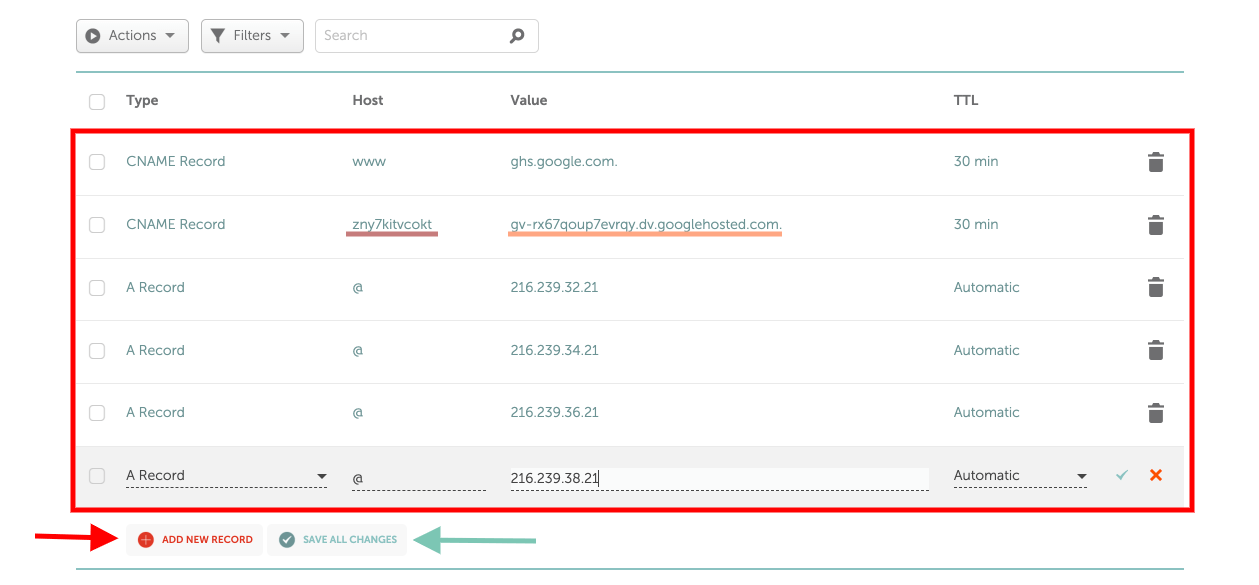
Lastly, save them using the “Save All Changes” button.
Step #3
Now, back to the settings page of your Blogger blog and click “Save.”

If you followed all the above steps correctly, you can now visit your website with your brand new domain name, and you’ll see your domain under the “Publishing” settings section without any errors.
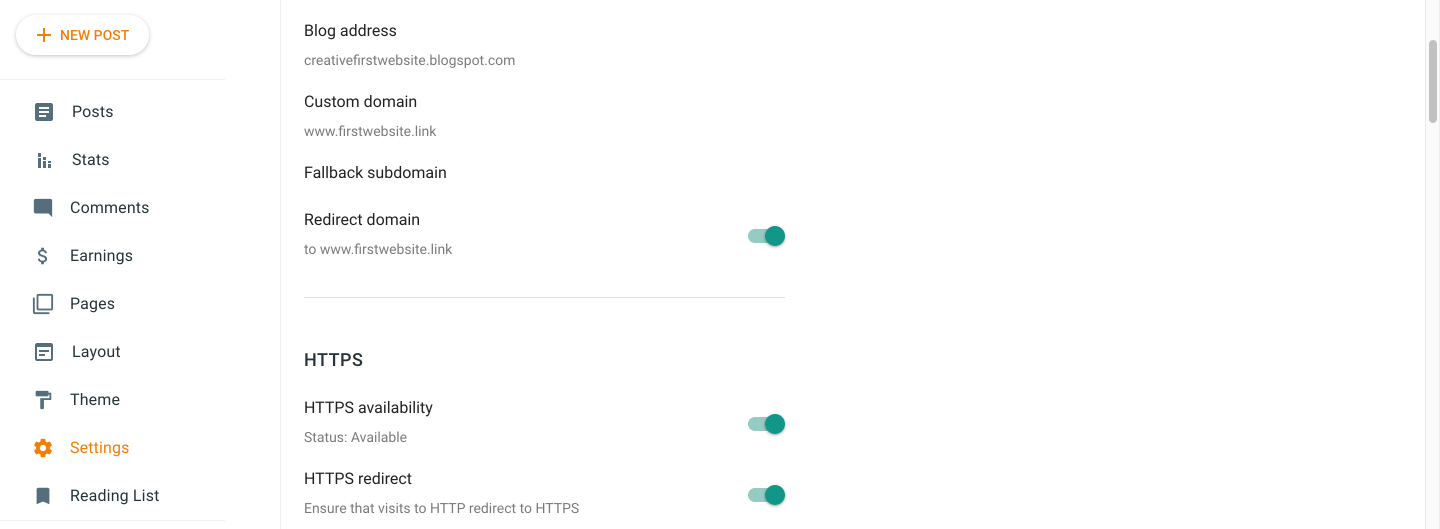
Moreover, remember that Google Chrome and other web browsers warn you that non-HTTPS websites are unsafe.
Any websites without the SSL certificate will remain HTTP, while those with SSL certificates will show HTTPS in users’ browsers.
So don’t forget to turn on HTTPS availability and HTTPS redirect to make your blog a safe place for your readers.
If you’re experiencing any issues, contact Namecheap or your domain provider.
If not, wait at least 30 minutes or double-check your DNS settings at Namecheap.
Final Thoughts
Every blog needs a domain name. It’s important to have your own, original, and catchy name that you can own for years.
Blogger is still a great platform for beginners, but it has a kind of limitations when it comes to customizing, adding features, and integrating with other tools.
If you’re serious about blogging, I highly recommend you start a self-hosted WordPress blog to become more advanced in blogging and turn your blogging journey into an online business.
Happy blogging!