
If you’re looking for an easy, free way to make your WordPress website faster and more secure, Cloudflare is the answer.
Speed is a huge factor in visitors leaving your website, and security keeps your content and visitors safe from malicious threats.
With Cloudflare, you can have both, and it won’t cost you a penny. This tutorial will show you how to set up Cloudflare for WordPress and shouldn’t take more than a few minutes.
So let’s get started!
Disclosure: Our website is reader-supported. If you purchase any product through our partner links, we may earn a commission at no extra cost to you.
What is Cloudflare?
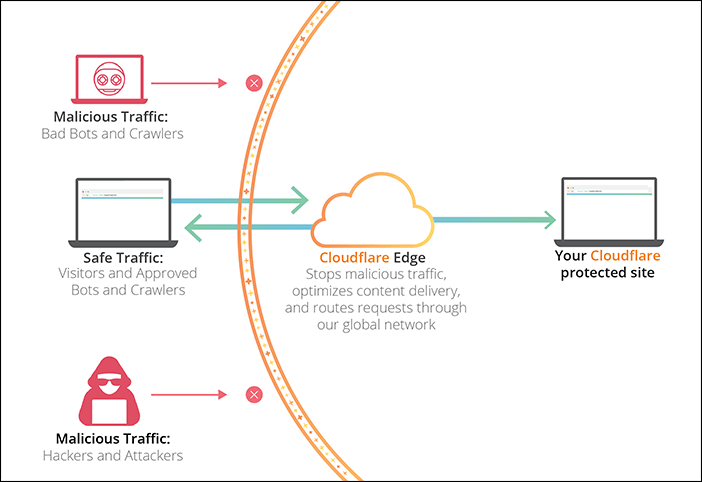
Cloudflare is a service that helps to keep your online presence secure. It can defend against malicious activities like DDoS attacks, malicious bots, and more.
Plus, it’ll help speed up your page load times, reduce bandwidth and CPU usage on your origin server, and easily add applications without being a coder. So, if you want to stay safe and make your site run smoother, Cloudflare’s got your back.
If you’re running a WordPress website, using Cloudflare as a CDN is an easy way to improve speed and security without breaking the bank. Plus, you can get a free account with lots of benefits for your site:
- Performance: Cloudflare provides caching capabilities that can improve page load speeds, reduce bandwidth consumption, and reduce CPU usage on the origin server.
- Increased security: Its security features are designed to block malicious traffic before it reaches your website, providing protection against DDoS attacks and other threats.
- Free Universal SSL: Cloudflare offers a free SSL Certificate to encrypt your traffic, increasing user privacy and trust.
- User experience: Cloudflare will ensure a quick-loading website, leading to improved user satisfaction and repeat visits.
Setting Up Cloudflare on WordPress
For a while now, I’ve been taking advantage of Cloudflare’s CDN services. Their free plan is great for someone like me who has a personal website – and their pro plans have some great additional features that may come in handy.
It’s only a five-minute job to get started with Cloudflare.
However, If you’re feeling like the setup process is a bit too much to handle, don’t worry – you can always work with a developer to get things rolling.
- Go to Cloudflare and sign up using your email address.
- Enter the website address that you wish to configure with Cloudflare.
- Select a plan (you can start with the free option and upgrade later).
- Cloudflare will start configuring your DNS records; click “Continue” when it’s done.
- Replace the existing nameservers with the Cloudflare ones and click “Save”. Refer to Cloudflare’s guide for more information.
Once you’ve changed your nameservers, it will take a little while for the new settings to be recognized across the globe. You’ll get an email once it’s all done, or you’ll see a notification on your dashboard.
Note: If you’ve connected your custom domain email address with Gmail, it might not work after you switch the default nameservers to Cloudflare. Check out Cloudflare’s guide to prevent this from happening, or get in touch with your email provider for help.
Speeding Up Your Website
Once you have completed setting up Cloudflare, it is time to get your WordPress site running faster.
Head to the Cloudflare dashboard and go to the “Speed” section and then the “Optimization” tab.
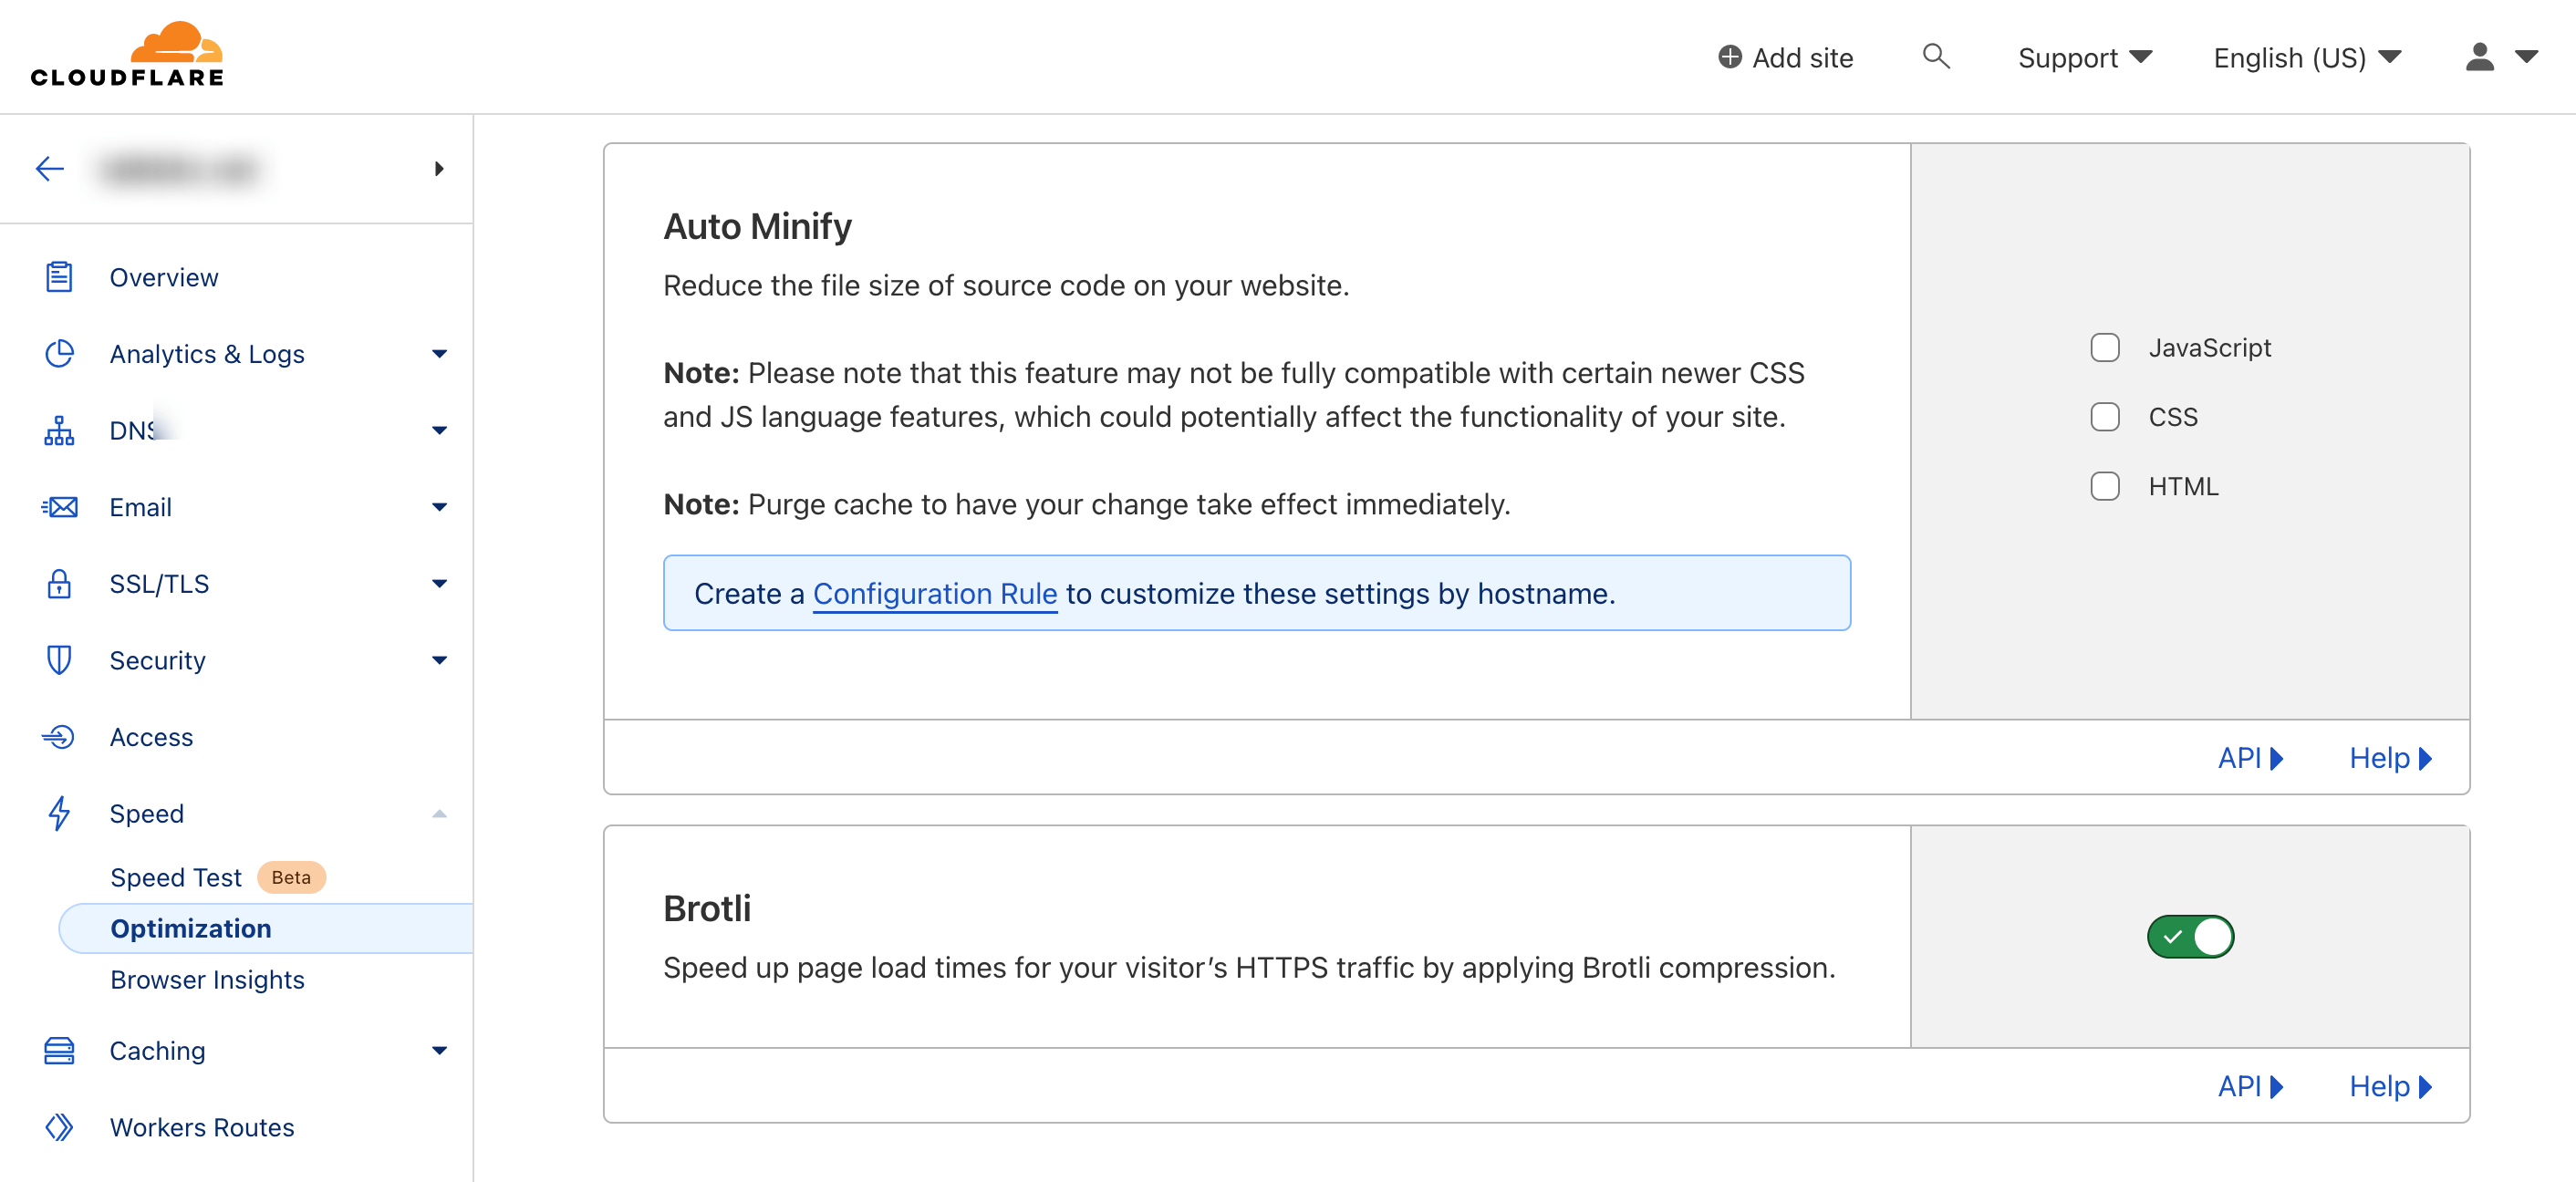
To get the most out of your website performance with Cloudflare CDN, turn on some features like Auto Minify, Rocket Loader, and Brotli.
These settings will help reduce your source code file size but can sometimes mess up your website’s layout. If that happens, just come back here and turn them off.
Note: To see your website changes take effect right away, try purging your cache (Dashboard > Caching > Purge Cache).
Cloudflare SSL Configuration
SSL (Secure Socket Layer) is a must-have for safeguarding your website and its visitors. It establishes an encrypted connection between the web server and browser, showing up as a green lock in the address bar, giving your visitors peace of mind that your website is secure.
Go to your Cloudflare dashboard, select “SSL/TLS”, and get your free SSL certificate.
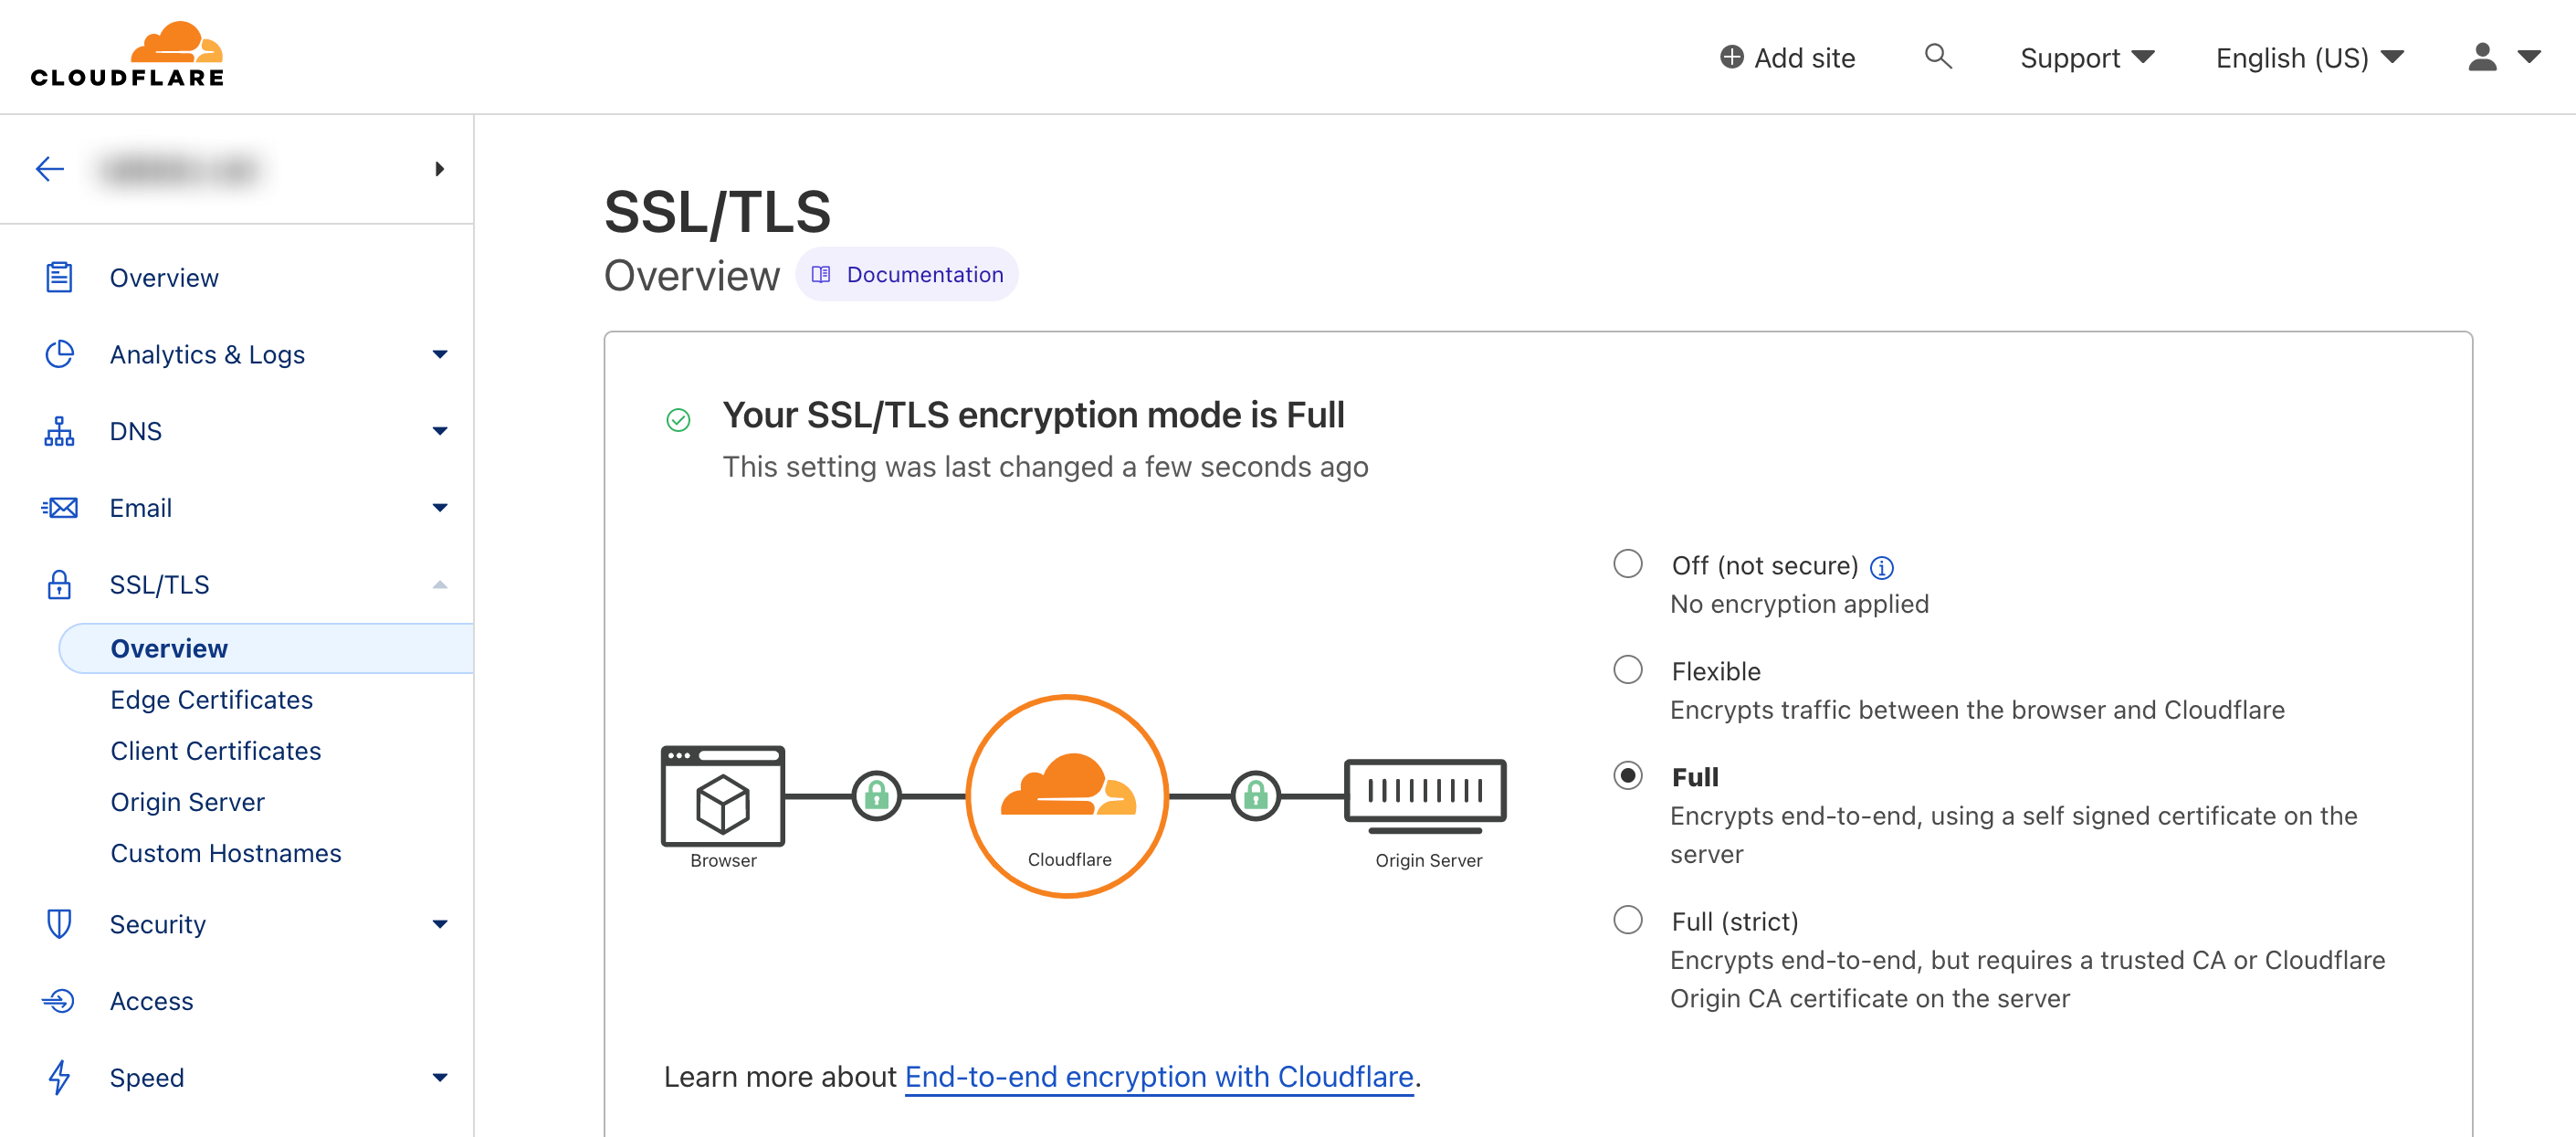
Cloudflare offers different levels of SSL configuration options to choose from, so you can get the protection you need. If you already have SSL from your origin server, Cloudflare can help you supercharge it, with encryption on both the visitor and server side.
Configuring Page Rules
Page rules can help you create a secure environment on your site. They let you decide which Cloudflare settings take effect for certain URLs.
For example, if you have a WordPress site, you can set the admin URL to yoursite.com/wp-admin and then configure the cache level, security level, and SSL settings from Cloudflare.
To get started, check out Cloudflare’s documentation.
With a free Cloudflare account, you can create up to three page rules, but you can buy additional page rules as you needed them.
Cloudflare WordPress Plugin
Cloudflare’s WordPress Plugin can help you beef up the security of your website.
Getting set up is super easy: all you need to do is enter your Cloudflare API keys and your email address.
Don’t worry if you don’t know what that is – you can find the API keys on your Cloudflare dashboard.
If you’re a Cloudflare PRO plan subscriber, you’ll get even more features like image optimization to help speed up your website.
Conclusion
If you’re looking to give your WordPress site a boost and add some extra security, Cloudflare is a great option. It’s free for blogs and personal sites, and it’s been a game-changer for me. It helps to speed up my website and make sure it’s safe, all without costing me a penny.
Here are a few more important things you should keep in mind when you’re using Cloudflare.
- Setting up Cloudflare is a breeze, but pay close attention when changing the nameservers configuration, in addition to HTML and CSS minifying features with your website.
- You must “Purge the Cache” for your changes to take effect instantly (found in the Dashboard under Caching > Purge Cache).
- If you’re making any live changes to your WordPress site, make sure to enable “Development Mode” in the dashboard to bypass the Cloudflare cache.
If you’re not confident in setting up Cloudflare yourself, you can always hire a Cloudflare expert from Toptal to do it for you.
Toptal is a leading platform for hiring top-tier freelancers and consultants, and they have a pool of Cloudflare experts who can help you set up and optimize your Cloudflare account to ensure your website is running at its best.
With Cloudflare’s free optimization and security features and the expertise of a Toptal Cloudflare expert, your website will be faster, more secure, and better optimized for success.

2 thoughts on “How to Set Up Cloudflare for WordPress”